If you have been following my other posts, you will know that we have had the underground plumbing installed and are finally to the point where we can start building walls (
Whoo hoo!) With our layout marked on the floor with painter's tape, we started building the wall that will separate the laundry room from the bathroom, since it needed to use 2x6" studs to accommodate the main plumbing lines.
 |
| Wall between Laundry and Bathroom |
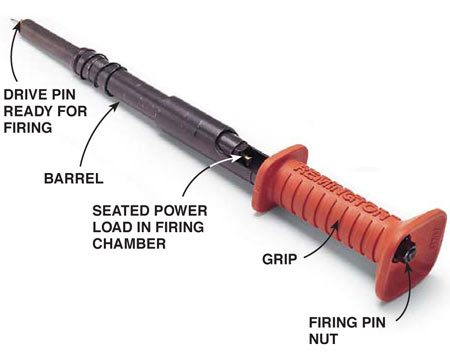
We used both construction adhesive and concrete nails to affix the pressure treated boards to the floor, so our walls would not be going anywhere. We borrowed a Powder Actuated Tool from my dad to "shoot" the fasteners into the concrete. If you do not know what this is, its a nifty tool that uses .22 caliber cartridges to drive the fasteners into concrete by hitting it with a hammer.
 |
| Powder Actuated Tool |
Make sure you wear goggles and hearing protection, because it is loud (
like a gunshot)! We had to use two separate plates on either side of the main plumbing stack you can see coming out of the floor. We were able to use one continuous plate on the ceiling, then we positioned the 2x4" studs at 16 in on center, with one stud each on either side of the stack. Some people build the wall on the ground and lift it into position, but with all of the existing issues in our basement, it was easiest for us to measure each stud and build the wall in place. Let me tell you, working with an old house presents challenges such as nothing being level and having to frame around existing heating ducts, plumbing, and electrical.
 |
| Wall After Drylok |
Before we started framing the exterior bathroom wall, I painted it with
DryLok to further protect against any dampness. I only used one coat because it was thick and hard to roll, which made me tired! But on the plus side, it covers well (
the wall was previously peach and green...really?) and it filled in most of the little pock marks where the concrete had deteriorated.
 |
| Exterior Bathroom wall |
We used the same process on all of the walls, putting the studs every 16 inches (
more or less...) Just like in the middle wall, we had to break up the floor plate around the plumbing stack on the exterior bathroom wall. We also had to get creative, as seen in the picture below, when we had to frame around the main furnace line.
 |
| Back wall of Laundry Room |
At least it is starting to look like two rooms (
Please ignore the mess in the background)! Now that the initial framing is up, the plumber will come back out to run the rest of the lines in the wall for the washer, utility sink, vanity, toilet, and shower. Our next step is to install the tub/shower enclosure and start running electrical.
 |
| View of both rooms |
Can you see our vision coming together yet?
Check out the other posts in this series:
And So it Begins...
Demo Time!
Breaking Ground


Oh yay! Exciting to see this all come together! I love home improvement progress posts like this! Good job!
ReplyDeleteCarylee | http://morepiecesofme.com
Thanks for visiting and for the encouragement! I know it may not look like much to some, but its nice to see the rooms take shape!
DeleteOh wow, kudos to you for taking on this project! I can't wait to see what it looks like in the end!
ReplyDeletehttps://forsevenseasons.wordpress.com
Even though it is a great learning experience, there are some days I wish I could win the lottery and pay someone to come finish it :-)
DeleteYou are really making progress! I am planning on painting one room in the basement with drylock this summer so your experience is good to know!
ReplyDeleteThank you, Laura! The Drylok works great, it is just unlike any "paint" I have ever used!
DeleteEverything is looking great! It's really coming together.
ReplyDeleteThank you Melanie! It is a slow process though!
DeleteMaking really great progress through these pictures. I wish you all the best with this reno! I've been watching so much HGTV lately, I love Fixer Upper, Jo and Chip are my favorite!
ReplyDeletewww.jerseygirltexanheart.com
Thank you so much! We are also addicted to HGTV and DIY network; it is where we learn how to do this :-)
DeleteI am enjoying seeing the progress posts. Can't wait to see more! Last year I painted my interior basement walls with Dry-Lock and I know what you mean, that stuff is thick and there were times I didn't think I would ever have it complete.
ReplyDeleteI am glad you are enjoying the posts! I have painted a lot of things, but like you, there were times I almost quit because my arm got so tired!
Delete