
This is a sponsored conversation written by me on behalf of Cricut. The opinions and text are all mine. This post contains affiliate links, which means I receive a small financial compensation if you make a purchase using this link
It is no secret that I love fashion and jewelry! I have recently been using my Cricut to make earrings, necklaces, and decorative tassels using faux leather. It is so fun and addictive and you can easily make ready-made projects, like these faux leather earrings in the Cricut Design Space™ or design your own using the software!
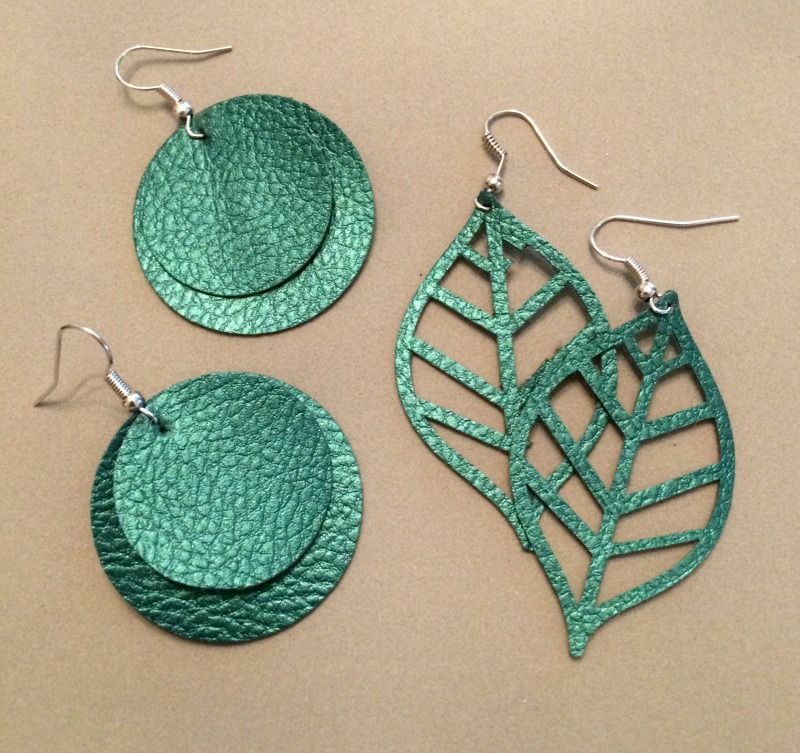
Today I am going to show you how I made two pair of faux leather earrings using the Cricut Design Space™. One is a "Make It Now" project and the other I created using the Shapes.
The great thing about the Cricut Design Space™ is that it is so easy to use. Most of the features are intuitive, allowing you to whip up a project in minutes. You can also get creative and customize a Make It Now project or design your own from scratch.

Supplies:
Cricut Explore® machine
Cricut Design Space™ software
12 in x 12 in StrongGrip Cricut® mat
Cricut® Faux Leather (I used Peacock)
Earring hardware
Pliers
Creating a Make It Now Project:
Open up the Cricut Design Space™ and sign in. You can browse the projects or narrow down your search with the filter. I searched on Fashion since I knew I wanted to make a pair of earrings and decided on a cutout leaf pair.
Click on the Make It Now button in the bottom right corner. Set the dial on the machine to Custom and select Cricut Faux Leather from the list on the screen in Design Space.

Cut out a piece of faux leather to fit the earrings and place it on the strong grip mat. I have tried the faux leather on the medium grip mat and it shifted and messed up the cut, so I definitely recommend using the strongest grip.

After you have cut the earrings out, weed them from the mat, and attach the earring hardware using pliers.


Creating a Custom Pair of Earrings:
Open up the Cricut Design Space™ and click on Create New Project. I am making a layered circle design, so I used the Insert Shapes option to add 4 circles of two different sizes. You can use the handles on the bottom right side of the box around the shape to size the earrings.
Follow the instructions above for cutting the faux leather and finishing the earrings.

Have you made your own, custom project using the Design Space? If so, let me know in the comments what you made!
If you have a Cricut Maker, you can use Cricut real leather to make earrings, like I did in this tutorial:
Pin Me:

You may also like: DIY Barrettes and Pendant


This is a sponsored conversation written by me on behalf of Cricut. The opinions and text are all mine.
This is something I would LOVE to try!! I need to pin this to remind me to try it later!
ReplyDeleteCarrie
curlycraftymom.com
Yes, You would love it!
DeleteIs that the back of the leather that stays attached to the mat?
ReplyDeleteYes, When you "weed" the design, the parts you do not need stick to the mat and you can pull them off later.
DeleteCan you tell me which blade is used to cut the leather and faux leather? I just got mine and haven’t set it up yet. I haven’t been able to find anywhere that says what blade should be used.
ReplyDeleteHi Lisa,
DeleteI have just used the blade that comes in the machine. I have had it for about a year and a half and have not had to change it yet.
Hi, do you use the regular blade (with the strong grip map) on the faux leather setting? Next to faux leather mine says "paper thin" and thats throwing me off. Its not really paper thin. Does your regular blade cut the mat a little bit? My deep cut blade/housing did. My material has been shifting even on the strong grip mat. Trying to master this. Thanks!
DeleteHi Elizabeth! When I made these, I used the regular blade on my Cricut Explore and the strong grip mat. I used the "faux leather 1mm Cricut" setting (I have a screen shot above) and it cut all the way through (along with the mat a little) You may need to clean your mat to bring the stickiness back if you use it a lot. You could also add masking tape around the edge to hold your leather on if you still have problems.
DeleteWhat does the back of this look like? Is it that brownish color so it has a slight resemblance to real leather?
ReplyDeleteYou can see the back of the material in the pic where the leather is on the mat. It is a greyish/brown shade that does resemble the back of leather.
DeleteLove this, thank you for sharing! I want to try this but I have a question. I am new to Cricut, just got a machine. How do you get the hole for where you attach your hardware? Does the machine cut it or is there a separate tool that is used. Thanks again!
ReplyDeleteYou can make the hole with your Cricut if you just insert a small circle at the top of your earrings, or you can poke it through, like I did.
Deleteare these special earring hooks? I am having a hard time opening the ring and closing the ring.. it weakens the metal and when i bend it back in place it snaps off.
ReplyDeleteNo they are not special, I purchased them in the jewelry section of Walmart.
DeleteI tried this and I have the following questions...
ReplyDelete1) do you mirror image?
2) I selected the faux leather earrings, however, it did not cut completely thru the material. I even selected "the deeper cut" and it didn't cut thru
THANKS!
Hi Renae, I did not mirror the image. Generally you only use that when you are doing an Iron On pattern. I did not have a problem cutting, but you could always send the mat back through to cut again or use a deep cut blade.
DeleteBeautiful! Can you use genuine leather as well and if so do you need a special mat?
ReplyDeleteHi Rachelle, I actually used real leather in this post http://www.realgirlsrealm.com/2017/02/painted-leather-earrings-and-necklace.html but it did not cut all the way through. I had to finish it with scissors. It would probably work better with a deep cut blade and select the thickest material to cut. You can also send the mat through for a second cut, which I have done for other materials.
DeleteYou cut 4 leaves, so did you glue 2 of them together?
ReplyDeleteNo, I did not, I just cut multiple to make 2 pair of earrings.
DeleteI haven’t tried the faux leather yet. Is it stiff enough that it doesn’t curl? I have purchased the faux suede, and while I haven’t tried making the earrings yet, it seems like it would curl once made into earrings.
ReplyDeleteHi Peggy! It is thinner than regular leather, but I have not found that they curl. I have had these for a year or so and have them hanging on my jewelry organizer when I am not wearing them.
DeleteHow did you get all the leather pieces off of your mat? My mat is a mess! I’m not sure how to get it clean.
ReplyDeleteI have a plastic scraper tool that I use for smoothing out the transfer tape when using vinyl and that gets most of the pieces off. I have also seen other bloggers clean their mats with a soap solution. I am sure you can easily find it if you search on Pinterest or Google. Good luck!
DeleteI make earrings using fabric will this machine cut fabric? I am thinking about getting one.
ReplyDeleteThis particular model does not have a blade to cut fabric, but the new Maker machine has a blade designed to cut fabric as well as all the other materials that the Explore can cut.
DeleteI just bought a blade for cutting fabric, but have not used it yet. Do you have any experience with it?
DeleteHi, Whitney! I have not used the fabric blade yet because I do not sew, but there a a ton of other blogger tutorials for those who have if you search Pinterest.
DeleteI see you made these out of leather - where do you use vinyl, to decorate them?
ReplyDeleteI use vinyl to customize thinks like trays, jars, crafting boxes, wall decor, mugs...the possibilities are endless. You can also use vinyl as a stencil to create handpainted signs and such. I have a ton of projects if you click my Cricut projects http://www.realgirlsrealm.com/search/label/Cricut and you can also find inspiration on Pinterest.
DeleteI've made several pair of earrings using the Cricut faux leather and suede. I've had issues with the cut leaving cut marks on the mat. Any suggestions? I also found faux leather rolls at Hobby Lobby in 7 different colors.
ReplyDeleteI have done other projects with faux leather and mine also cuts through the mat. The new Maker machine allows you to change the pressure, but I have not tried that yet.
DeleteI have the cricut maker and have bought some of the faux leather rolls from hobby lobby. I cannot get it to stick to anything. I have it on the strong grip mat and have used masking tape, duct tape and painters tape as has been suggested through internet searches and I cannot get anything to stick to it enough to stay stuck on the mat. Do either of you have any suggestions? Thank you.
DeleteYou definitely need to use the strong grip mat. I have not had trouble with it, but you could try putting the leather face down on the mat to help it stick better than the fuzzy side. Masking or painter tape should work as well...I have used it to hold chipboard while cutting on the Maker. It may also help to lay out the leather since it tends to want to roll up. I hope this helps!
DeleteI use the fabric grip mat for my faux leather and then rub the scraper across the back to really get it to stick.
DeleteVery cute tutorial, and one I can't wait to try! Thank you for sharing it!
ReplyDeleteA note I'd like to add about cutting the mat; I personally use the Cricut Maker, and it *does* also cut the mat, at least when I change it to add more pressure. I didn't notice that it did it with normal pressure. :) I work primarily with heavier materials, though, and use more pressure almost exclusively, so the marring of the mat hasn't been an issue for me - at least not yet, anyway. Hope that helps!
Thanks for the update and the tips. I used a heaver pressure when using felt with the Maker and it left small indention in the mat, but nothing that caused damage.
DeleteCan I do it on my own? We dont have Circuit machines.
ReplyDeleteYES! I have a friend that hand cuts leather to make earrings similar to this for her etsy shop. You could easily cut out any design you wanted by hand. The machine just makes it easier and quicker.
DeleteHi, what do you back the earring with, if anything?
ReplyDeleteYou do not have to back the earring with anything.
DeleteLove it! Thanks for sharing! I love jewelry as well and this is one way of making it.
ReplyDeleteThank you! It is one of my favorite projects!
DeleteCan you use the Cricut Explore Air 2? I don't see a Leather setting but I do have a Bonded Fabric setting. Thanks
ReplyDeleteWith the Air 2, you can only use the faux leather, which is thinner than regular leather. I tried it with regular leather and the cut is not deep enough. You can however cut leather with the new Cricut Maker.
DeleteI have a Cricut One, and use the faux leather to make earrings. I have also had success using glitter or other iron-on to 'decorate' the faux leather earrings. I put a gold glitter leaf on a black pair of faux leather earrings, for example. And holographic iron-on really looks great on the faux leather.
ReplyDeleteYes, that is a great idea! I have used iron-on on faux leather ornaments.
DeleteCan you heat press the faux leather to get it flat?? My faux leather from cricut always rolls a little. I have tried laying it out before cutting it for a couple days but they always tend to still roll.
ReplyDeleteI have not tried that, but I am sure you can. I have used iron on vinyl on faux leather and the heat did not hurt it. You can also try to put the faux leather on a strong grip mat with the back side facing up, so it lays flat.
DeleteWhere do you find the faux leather?
ReplyDeleteThanks for sharing!
Hi! I get mine from Cricut.com. There is a link in my supply list above that takes you to it! Sometimes you can also find it at craft stores.
DeleteWhen I cut out the earrings using faux leather, what kind of glue would I use to attach the two pieces together?
ReplyDeleteHi! I did not glue any of my pieces together, but you could use hot glue or maybe fabric glue to attach them.
DeleteHi, I'm having a hard time with my earrings turning and showing the back side when wearing. Do u have any suggestions for this?
ReplyDeleteHI! I am not sure what kind of earring findings you are using, but you may need to add an extra jump ring to make the earrings face forward.
DeleteHey! So I just started making few pairs of earrings. My only issue is the faux leather earrings won't lay flat. I even tried ironing with a setting mentioned on another blog and it just makes the earrings turn the other way. Any other suggestions?
ReplyDeleteHi Yoshi, I have not really had that problem. You may have to lay the sheet of faux leather flat with a book or something on top of it to flatten if the ironing does not work.
DeleteHow big are the circles?
ReplyDeleteThe large circles are 2" but you could size them to your desired dimensions.
DeleteHi!! I just got a cricut maker and try to do the same kind of earrings using the Faux leather from hobby lobby and didn’t cut the earrings, I buy the strong mat too and did cut, can you tell what is the setting for this kind of leather the hobby lobby one? I will really appreciate. I waste two rooms of leather already and have not success.
ReplyDeleteYou can change the amount of cutting pressure on the Maker, so I would use the Knife blade and adjust the cut pressure in DesignSpace.
Delete